Subject: Headlamp Actuator Replacement Procedure
Source: 97moneypit - Corvette Action Center Forum Member
Models: 1997-2004 Chevrolet Corvette
The CAC has been a very helpful resource so I thought I’d give back some pics and explanations of my first DIY repair project on my 1997 Corvette. The driver side headlight actuator needed to be replaced. Decided to do it myself after c4c5’s recommendations and it went without a hitch. So here are a few pics I took trying to explain the process for others that want to do this simple repair. Hope it helps.
As for all electrical work, first remove the negative lead on the battery as noted in the service manuals.
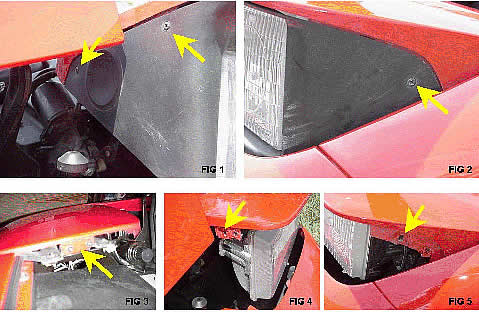
Remove the headlight bezel and the opening door. There are three phillips screws for the bezel (Figs. 1 and 2) and four T-15 torx screws for the opening door (Figs. 3, 4, 5).

Now you can disconnect the main wiring harness (Fig. 6) and reach behind the lamps to disconnect those wiring harnesses (Figs. 7, 8). Be sure to note which one goes where. They are color coded.
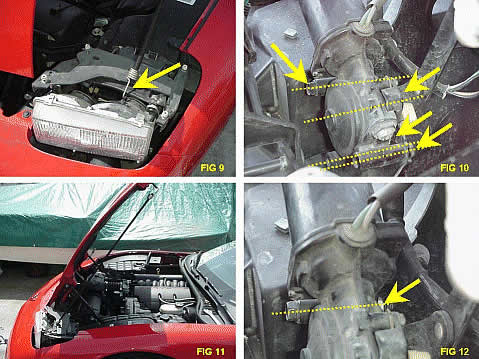
I used a bungee cord to support the headlamp assembly (Figs. 9 and 11 (my wife was too busy to help). The assembly will have nothing holding it up once the actuator is removed. I made sure that the bungee didn’t put too much pressure on the unit. Just enough to hold it up.
There is one through bolt (Fig. 12), (2) one inch long bolts and one nut holding the pivot arm. (Fig. 10). Also see figures 17 and 18. I have labeled each bolt/nut A, B, C, D.
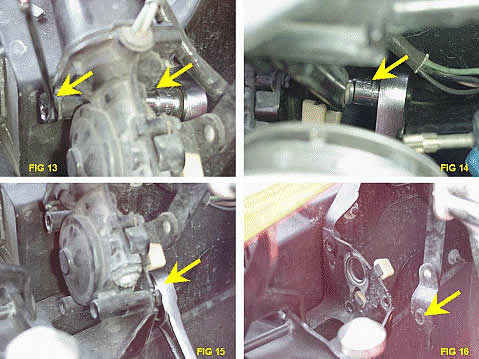
These are not the easist to get to but you can reach under the lamp assembly with your right hand to slip a 10mm socket on the inside nut of the through bolt and hold the outside bolt head with a 10 mm box end wrench using your left hand (Fig. 13). You’ll have to reach around the actuator and under the headlamp assemble to get your right hand in there. I did it pretty much by feel and worked the 10mm socket wrench in there to remove the actuator bolts and the nut on the pivot arm. (Figs. 15, 14 respectively). Figure 16 shows the slotted hole on the pivot arm that will aligned with the shaft on the actuator.
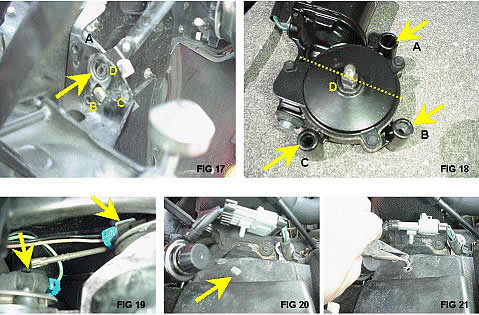
Figures 17 and 18 shows the four locations for the bolts and the shaft nut for the pivot arm.
To install the new actuator I rotated the manual control knob on the actuator until the flat sides of the shaft aligned as shown in Figure 18. This way it will be closely aligned with the slot in the pivot arm.
Putting the actuator back in is just the reverse of removing it. I installed the long through bolt first (A), then put in the front most bolt (C) to help hold the motor in place before putting in bolt (B) and the shaft nut (C). It’s a little tricky getting to the nuts with the socket wrench and you might bang your knuckles a few times but it works.
Once you get the actuator bolted in and the pivot arm on the shaft tightened up, replace the wiring harnesses to the back of the lamps Fig. 19).
To put the opening door back on, you will have to lower the assembly to get to the two screws on the back of the door and have it raised to get to the two onthe sides. Replace the bezel with the assembly in the up position.
Now you can reconnect the main wiring harness. I pulled the old pop-in connector out with a pair of pliers (Fig. 20 and 21).
This saved me over $200 in labor charges and took me about 90 minutes (not including the time taking the pics.)
I got to work on my tan to boot.
I could have included so many more pics. But I think these should be enough to describe the basic procedure. I hope these pics and description make sense.
Kirk
DISCLAIMER: This How-To article contains information from other Corvette owners and enthusiasts that are members of the Corvette Action Center forums. Any information used from this How-To section is used at your own risk. Although we do our best to screen and verify the information provided here, the Corvette Action Center is not responsible for any inaccuracy in this How-To section. Always consult your service manual and/or a qualified automotive service technician before conducting any type of automotive repairs or modifications on your own. For further information, please review our Legal Disclaimer .
Article ID: 814
Created: August 5, 2014
Last Updated: August 5, 2014
Online URL: https://www.corvetteactioncenter.com/tech/knowledgebase/article/1997-2004-corvette-headlamp-actuator-replacement-procedure-814.html