1965 - 1978 Corvette: Service Bulletin: Servicing Disc Brake Calipers
Subject: Servicing Disc Brake Calipers
Model and Year: 1965 - 1978 Corvette
Source: Chevrolet Dealer Service Technical Bulletin
Bulletin No: 74-T-41
Section: 1a
Date: August 9, 1974
TO: ALL CHEVROLET DEALERS
The following procedure is published in the 1979 Corvette Service Manual and should be used when servicing 1965-78 Corvettes. This procedure allows for light honing of caliper bore and specifies the use of a silastic sealant during piston assembly.
A. Removal and Disassembly
- Remove and disassemble the caliper per steps outlined in Section 5 of the Service Manual under "Caliper Overhaul - Four Piston."
B. Cleaning and Inspection
- Remove all traces of dirt and grease using brake fluid to clean all metal parts. DO NOT use mineral base solvents to clean brake parts. After cleaning, wipe all fluid from the boot counterbore on caliper and boot groove on the piston. These surfaces must be clean and dry at assembly to permit the silastic sealant to properly adhere.
- Using an air hose, blow out all fluid passages in caliper haves, making sure no dirt or foreign material remains in passages.
- Discard all rubber parts. Boots, seals, and "O" rings should be replaced with new service parts.
- Carefully inspect the piston bores in the caliper halves. They must be free of scores and pits. A scored or damaged bore will cause leaks. The bore surface should be restored by polishing with a very fine crocus cloth. If this fails to achieve the proper results, the surface may be lightly honed. Replace the caliper half if either bore is damaged to the extent that light honing does not remove all pits and/or scoring.
- Check the fit of the piston in bore using a feeler gauge. Clearance should be as follows:
1 7/8 inch bore - .0045" to .010"
1 3/8 inch bore - .0035" to .009"
If the clearance exceeds either of the upper limits, a new piston or caliper housing will be required.
C. Assembly
- Assemble the seal in piston groove. The lip of the seal must face large end of piston. Be sure lips are in piston groove, and do not extend over the step in end of groove.
- Place the spring in the bottom of piston bore.
- Lubricate the seal with clean brake fluid.
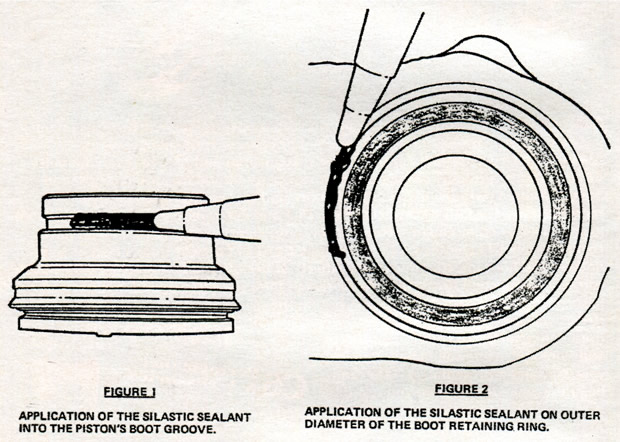
- Place a bead of silastic sealant (P/N 1052366) or equivalent into boot groove on piston (see Figure 1).
- Install the piston assembly in bore using an appropriate piston ring compressor tool. Use care not to damage seal lip, as piston is pressed past edge of bore.
- Assemble the boot in piston groove. The fold in boot must face toward the end of piston with seal on it.
- Depress the pistons and check that they slide smoothly into the bore until the end of piston is flush with end of bore. If not, recheck the piston assembly and location of spring and seal.
- Position the boot seal installer tool over the piston, and seat the steel boot retaining ring evenly in the counterbore. The retaining ring must be flush or below the machined face of the caliper.
- Depress pistons and, while holding in a depressed position, place a bead of silastic sealant (P/N 1052366) or equivalent on the outer diameter of boot retaining ring (see Figure 2) forming a seal between ring and housing.
- Position the "O" rings in small cavities around brake fluid transfer holes in both ends of outboard caliper halves. Lubricate the hex head bolts with Delco brake lube or dip in clean brake fluid. Fit caliper halves together and secure with bolts. Torque bolts to specifications as follows:
Front Calipers - 130 ft. lbs.
Rear Calipers - 60 ft. lbs.
D. Install caliper as specified in appropriate Service Manual.
Chevrolet Motor Division
General Motors Corporation

Article ID: 1147
Created: January 27, 2015
Last Updated: January 27, 2015
Online URL: https://www.corvetteactioncenter.com/tech/knowledgebase/article/1965-1978-corvette-service-bulletin-servicing-disc-brake-calipers-1147.html

