Subject: Blown Thermal Fuse Diagnosis
Model and Year: 1972 Passenger Car Air Conditioning Systems
Source: Chevrolet Dealer Service Information Bulletin
Bulletin No: 72-I-9
Section: Ia
Date: Aug. 14, 1972
TO: ALL CHEVROLET DEALERS
Beginning with 1972 production, a system is used to disengage the air conditioning compressor clutch in the event of loss [of] refrigerant charge. The system consists of a pressure sensitive switch (superheat switch), located in the suction cavity of the rear compressor head and connected to a time delay fuse (thermal fuse) in the compressor clutch coil electrical feed circuit.
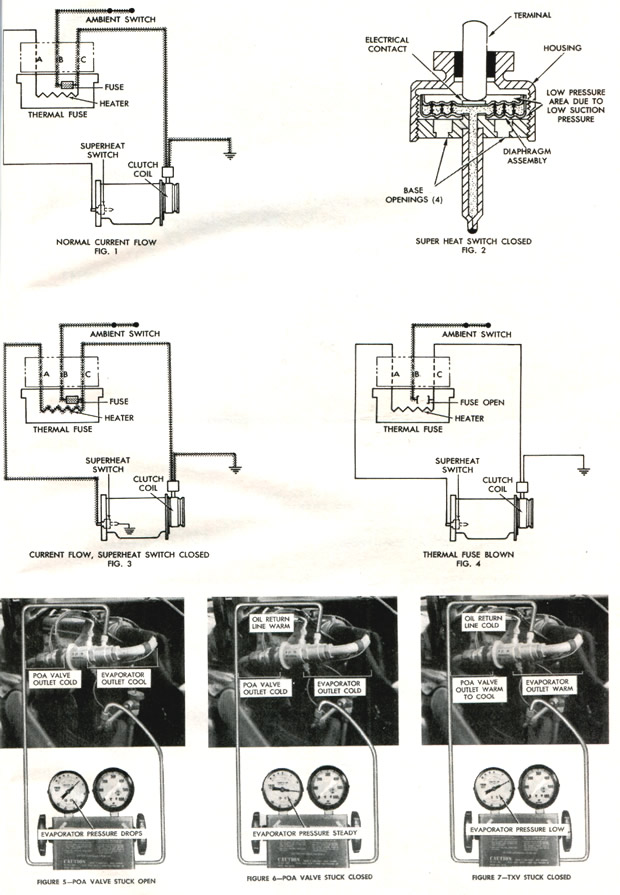
During normal operation, current flows directly through the thermal fuse of the compressor clutch (Figure 1). In the event the suction pressure at the compressor drops abnormally low for any reason, such as a stuck POA valve, stuck closed TX valve or loss of refrigerant, the superheat switch will close (Figure 2) providing a ground for the heater circuit of the thermal fuse (Figure 3). The heat melts the fuse (this takes about 2 minutes) and opens the circuit )Figure 4) causing the compressor clutch to disengage.
Since the operation of the superheat switch and thermal fuse is dependent upon both the electrical and mechanical systems, diagnosing a thermal fuse failure involves diagnosing both systems. However, both systems should be diagnosed separately, using a step by step procedure beginning with the electrical system as outlined in this bulletin.
Chevrolet Motor Division
General Motors Corporation
ELECTRICAL SYSTEM DIAGNOSIS
If the compressor clutch does not engage and the thermal fuse is suspected to be the cause, remove the thermal fuse, turn the ignition switch and air conditioning system on and proceed as follows:
1. Check for current supply to the thermal fuse connector by connecting a test lamp from the "B" terminal of the connector to ground. Bulb should light. If bulb does not light, check wiring, ambient switch and control head for cause.
2. Check for failed superheat switch by connecting test lamp from the "B" to the "A" terminals of the connector. Bulb should not light. If bulb lights, replace superheat switch.
3. Check for complete circuit through the compressor clutch coil by connecting test lamp from the "B" to the "C" terminals. Bulb should light. if bulb does not light, check clutch coil and wiring.
MECHANICAL DIAGNOSIS
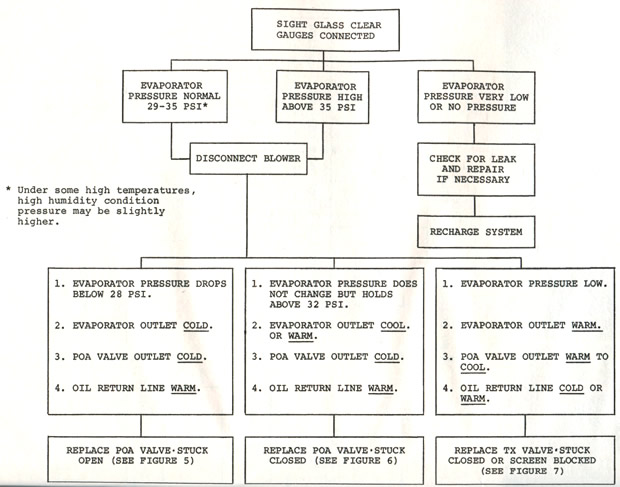
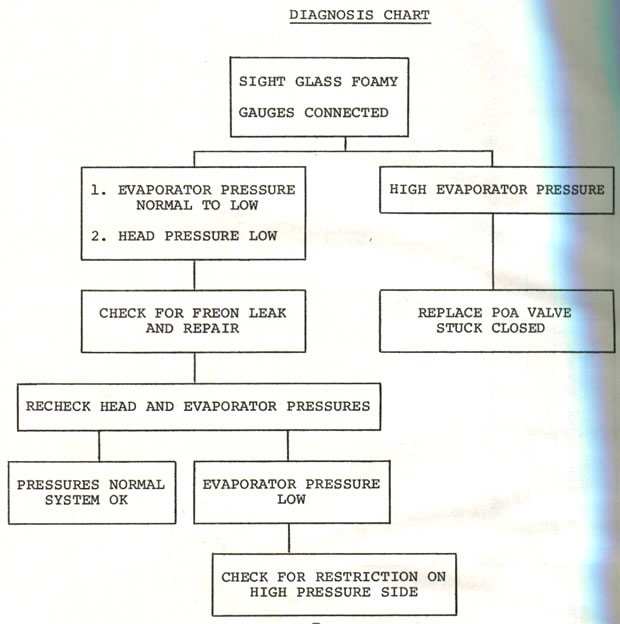
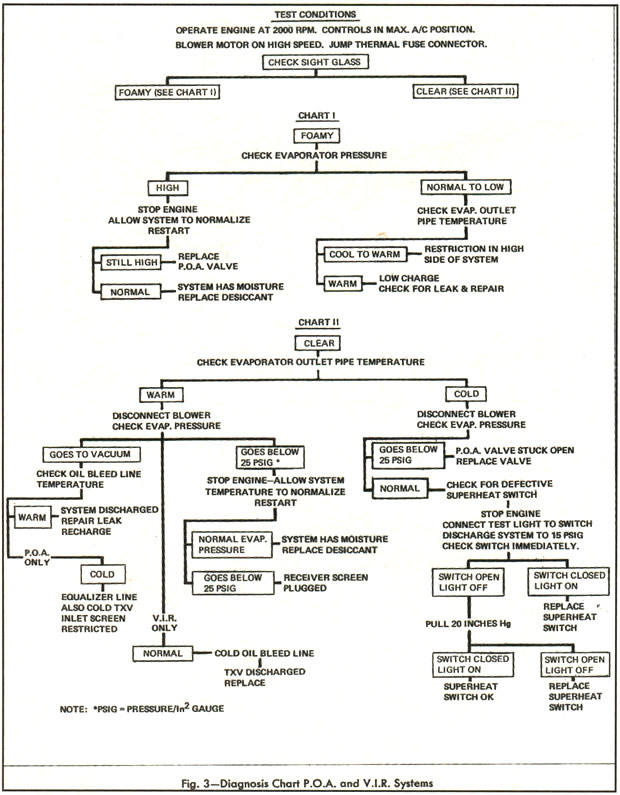
if the electrical system appears to be satisfactory, disconnect the thermal fuse lead from the superheat switch, install a known good thermal fuse and connect pressure gauges. Then operate the air conditioning system on maximum cool at an engine speed of 1200 to 1500 RPM, check the sight glass on the receiver dehydrator and proceed using the appropriate diagnosis cart in this bulletin.
NOTE: If after completing the "Mechanical Diagnosis" the cause of the blown fuse cannot be determined, immediately check the superheat switch terminal for ground. if the terminal is grounded, replace the switch.


Article ID: 1127
Created: January 24, 2015
Last Updated: February 8, 2015
Online URL: https://www.corvetteactioncenter.com/tech/knowledgebase/article/1972-corvette-service-bulletin-blown-thermal-fuse-diagnosis-1127.html