1991 Corvette: Service Bulletin: Squeak and Rattle Diagnosis Guide
Estimated Reading Time: 5 Minutes Subject: SQUEAK AND RATTLE DIAG. GUIDE DIAGNOSTIC AID/CORRECTION
Model and Year: 1991 CORVETTE
Source: Chevrolet Service Bulletin
Bulletin Number: 91-264-10 - (03/25/1991)
The following information is being distributed as an aid in squeak and rattle diagnosis. The insulator material references describe either 3M# 06370 (1/4" thick), #06375 (1/8" thick) foam tapes; Dominion/American Sure Seal # RAB1 (1/4" thick foam tape (or equivalent). The felt insulator material has adhesive backing and may be obtained from most local fabric stores.
Note: Reference specific item on removable roof front attaching bolt retainers (new parts and operation).
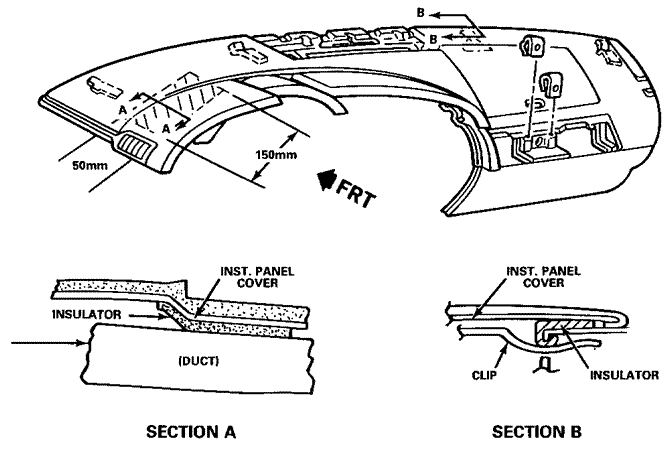
LEFT SIDE INSTRUMENT PANEL
COMPONENT CORRECTION
- Instrument panel cover
1. Rattle forward of gages cluster 1. Insulate area shown in Figure at A/C cross car duct. 1 and Figure 1, Section A (felt material).
2. Rattle at front edge of cover 2. Reposition existing, or near windshield. install felt insulators on metal opening at all retainers, (see Figure 1, Section B). - Left defogger outlet
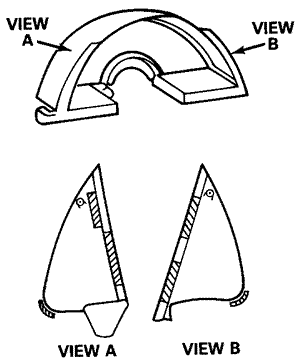
1. Buzzing against instrument 1. Apply felt insulator (1/2" X panel housing. 3" as shown in Figure 2, view A). - A/C cross car duct
1. Rattle at top of instrument 1. Apply foam insulator (1 /8") panel housing. to housing as shown in Figure 2, view A.
2. Rattle at left side SIR 2. Apply foam insulator (1/8") bracket. around bracket as shown in Figure 2 view B. - Instrumentation area
1. Squeak in instrument cluster 1. Apply felt insulators to bezel to cover. bezel edges and surfaces in locations as shown in Figure 3, views A and B.
RIGHT SIDE INSTRUMENT PANEL
COMPONENT CORRECTION
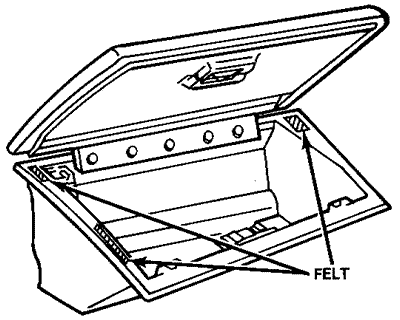
1. Rattle in glove box door to 1. Apply felt insulators as shown glove housing. in Figure 4, or in any contact area.
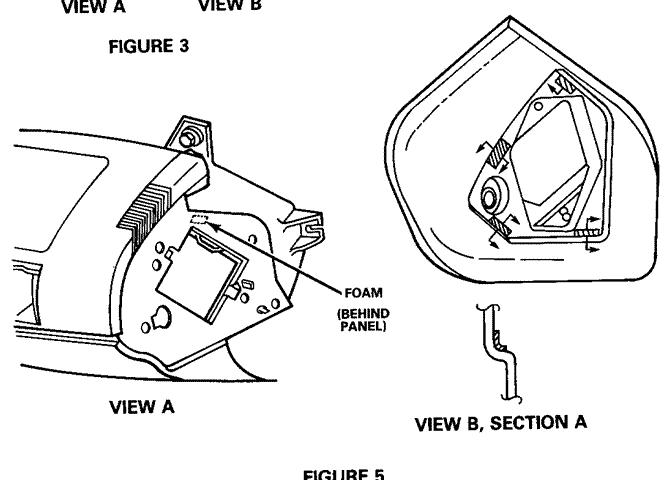
2. Buzzing of fuse box rivet 2. Apply small 1/4" foam heads to instrument panel insulator between rivet head cover. and cover as shown and cover as shown in Figure 5, view A.
3. Buzzing of fuse box door 3. Apply felt insulators (1/4" X in the opening. 1") as shown in Figure 5, view B. Position felt into the radius of the opening.
CONSOLE
COMPONENT CORRECTION
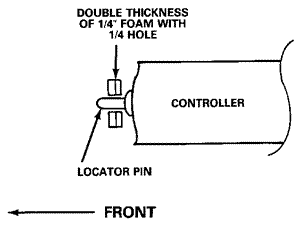
1. Buzzing of A/C controller to 1. Apply double thick 1/4" foam instrument panel housing. with 1/4" hole around forward locator pin of controller and reinstall, see Figure 6.
2. Squeak of console shift trim 2. Apply felt to right side and plate to console surfaces. left edge of trim plate, see Figure 7.
3. Squeak when opening console 3. Remove door and carefully compartment door. trim vinyl material away from door hinge spring area to provide slight clearance. DO NOT OVERTRIM.
OTHER INTERIOR ITEMS
COMPONENT CORRECTION
1. Buzzing of rear compartment 1. Adjust compartment door lock stowage doors when closed. striker door lock striker for better fit.
2. Rattles in sun visors over 2. Replace sun visors with new any irregular road surfaces. part from GMSPO.
ROOFS AND CONVERTIBLES
COMPONENT CORRECTION
- Convertible top deck lid 1. Squeak at deck lid hinge pins. 1. Lightly lubricate with spray type lubrication.
2. Squeak at torque rod rollers to 2. Lightly lubricate with spray rods and hinges. type lubrication.
3. Rattle at underside of lid 3. Position foam insulator with top down if center (1/4") to underside of panel insulator is missing. above top bow at contact marks.
4. Rattles of release cable to 4. Apply foam insulators (1/8") underside of lid. to underside of lid in area of contact marks.
- Removeable roof panel
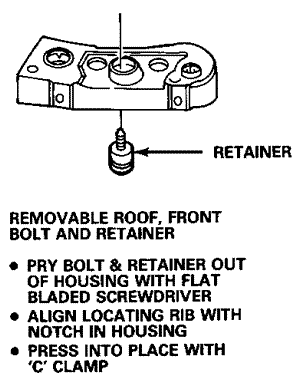
1. Rattle of front attaching bolts 1. Install new bolt retainers, when panel is stowed in rear. P/N 10 1 75804, see Figure 8.
Procedure:
1. Soak new retainers in warm water to aid in installation.
2. Remove roof panel and stow.
3. Remove upper trim covers at right and left latch areas.
4. Remove right and left sun visors, inside mirror and center garnish molding.
5. Carefully pry original retainer and bolt out of housing using a flat blade screwdriver or other suitable tool.
6. Install bolt in new retainer, align locating rib on retainer with notch in housing and press into place with a "C" clamp and socket.
7. Reinstall garnish molding, inside mirror, sun visors and upper trim covers.
Labor Operation Number: T1704 Labor Time: .6 Hour (Both Sides) Trouble Code: 92
2. Rattle if roof panel frame 2. Reinstall and glue plugs into filler plugs become loose. position with small amount of P/N 12345096* or 3M08011.
UNDER THE VEHICLE
COMPONENT CORRECTION
- Heat shields
1. Rattle of fuel filter heat 1. Carefully bend to provide shield against right side clearance. frame rail.
2. Rattle of brake line heat shield 2. Carefully bend to provide to manifold heat shield (LT 5). clearance.
3. Buzzing of right side heat shield 3. Carefully bend to provide to toepan. clearance.
4. Rattle of left side heat shield 4. Carefully bend away from to exhaust pipe flange (LT5). flange to provide clearance.
- Brake lines and fuel lines
1. Rattle of brake lines to left 1. Secure the lines tightly side frame rail. to each other with plastic tie straps.
2. Rattle of fuel lines to right 2. Carefully bend to provide side frame rail. clearance.
DOOR HINGES
COMPONENT CORRECTION
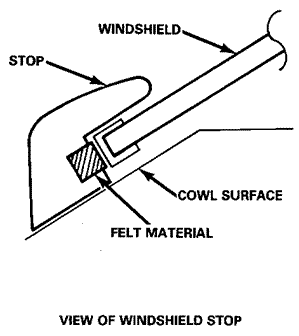
1. Squeaks when opening doors at 1. Lubricate ALL hinge torque hinge torque rod contact areas. rod contact areas with 30 wt. motor oil or grease, see Figure 9. UNDER THE HOOD --------------------------- COMPONENT CORRECTION ------------------------------ ------------------------------ 1. Popping/clicking at left 1. Apply felt to windshield front of windshield area. stop at area contacting windshield edge, see Figure 10.
2. Popping/clicking at front of wind- 2. Carefully trim edge of shield. Edge of cowl leaf screen cowl leaf screen in areas contacting flange on cowl. contacting cowl flanges. cowl flanges. flange on cowl.
3. Squeak at left front windshield 3. Reposition ECM cover area. ECM cover to hood seal. forward or trim cover in contact areas.
4. Squeak at right side 4. Reposition hose clamps to of vehicle. Hose clamps provide clearance to right for high fill container diagonal brace, see Figure contacting diagonal brace. 11.
Parts are currently available from GMSPO.


General Motors bulletins are intended for use by professional technicians, not a "do-it-yourselfer". They are written to inform those technicians of conditions that may occur on some vehicles, or to provide information that could assist in the proper service of a vehicle. Properly trained technicians have the equipment, tools, safety instructions and know-how to do a job properly and safely. If a condition is described, do not assume that the bulletin applies to your vehicle, or that your vehicle will have that condition. See a General Motors dealer servicing your brand of General Motors vehicle for information on whether your vehicle may benefit from the information.
© Copyright General Motors Corporation. All Rights Reserved