1997 - 2002 Corvette: Service Bulletin: Door Rattle with Moderate to High Audio System Volume
Estimated Reading Time: 5 Minutes Source: Chevrolet Dealer Service Bulletin
Number: 01-08-64-009A
Date: 06-19-2002
Subject: Door Rattle with Moderate to High Audio System Volume
Model Year: 1997-2002 Chevrolet Corvette
This bulletin is being revised to update the Models and Correction information. Please discard Corporate Bulletin Number 01-08-64-009 (Section 08 -- Body and Accessories).
Condition
Some customers may comment on a rattle or buzzing from the doors with moderate to high audio system volume.
Cause
Amplitude of the audio system may cause door parts to rattle and vibrate.
Correction
Follow the service procedures below to correct the noise concerns.
Remove both door trim panels. Refer to Trim Panel Replacement - Doors in the Service Manual.
Important
There have been multiple production changes throughout the production of this vehicle. The VIN breakpoints are listed with the repair procedures below to indicate which vehicles will require the procedure specified.
After performing the necessary procedure(s), install both door trim panels. Refer to Trim Panel Replacement - Doors in the Service Manual.
Important
Change implemented in 2002 VIN breakpoint 125078. Vehicles built prior to this breakpoint will require the following procedure.
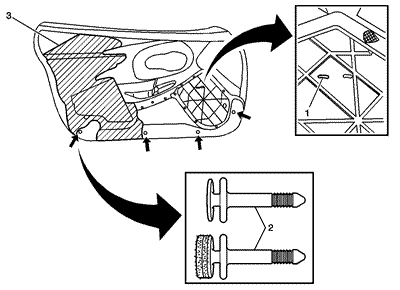
New speaker screen is made from a different material and Bose® emblem is provided due to risk of old emblem becoming damaged while removing.
- Straighten the speaker grille tabs and remove the grille from the door panel.
- Remove the Bose® emblem from the speaker grille and discard.
- Remove the speaker screen from the grille and discard.
- Install the new speaker screen to the grille.
- Install the new Bose® emblem and carefully crimp the staples (1) to the speaker grille.
- Insert the speaker grille tabs into the door panel slots and bend the tabs to lock the grille in place.
- Trim any extra loose door panel leather skin from around the speaker grille area on the back side of the door panel.
- Repeat above steps for opposite side.
Important
Change implemented in 2001 VIN breakpoint 115500. Vehicles built prior to this breakpoint will require the following procedure.
- Remove the 4 lower door trim panel retainers (2) from both door panels.
- Cut 16 dime sized coins from the fine side of Velcro®, 3M® P/N 051131-06481, or equivalent.
- Install 2 Velcro® coins to each of the 8 door trim panel retainers (2).
- Reinstall the door trim panel retainers (2) into the door trim panels.
Important
Change implemented in 2000 VIN breakpoint 110900. Vehicles built prior to this breakpoint will require the following procedure.
- Only perform the following procedure if the side impact styrofoam (3) is loose from the door panels.
- Resecure the side impact foam (3) to the door trim panels using 3M® Urethane, P/N 051135-08690, or equivalent.

Important
Change implemented in 1999 VIN breakpoint 133100. Vehicles built prior to this breakpoint will require the following procedure.
- Remove the water deflector.
Important
Do not damage the push-in retainer/tie straps (2). They are to be reused.
- Remove the push-in retainer/tie straps (2) that retain the window regulator cables (3) to the inner door panels.
- Reposition the push-in retainer/tie straps (2) out of the way.
- Add 122 mm (5 in) of 3M® Open Cell Interior Foam Tape (1), P/N 051131-62385, or equivalent, to the window regulator cables (3) where they contact each other and the inner door panels.
- Reinstall the push-in retainer/tie straps (2).
- Reinstall the water deflector.

Important
Change implemented in 1999 VIN breakpoint 130801. Vehicles built prior to this breakpoint will require the following procedure.
- Remove the inside door handle. Refer to Door Handle Replacement - Inside in the Service Manual.
- Remove the manual lock rod (1), lower of the two lock rods, from the anti-rattle retainer.
- Remove the manual lock rod (1) from the door lock assembly by twisting the lock rod out of the retainer.
- Install new manual lock rods (1), P/N 10232183 (left side) and P/N 10232184 (right side), into the door lock assembly.
- Install the manual lock rods (1) into the inside door handle and the anti-rattle retainer.
- Reinstall the inner handle. Refer to Door Handle Replacement - Inside in the Service Manual.
- Reinstall the water deflector.
Important
Change implemented in 2000 VIN breakpoint 101578. Vehicles built prior to this breakpoint will require the following procedure.
- Remove the wire harness (2) from its retainers.
- Insulate the wiring harness and in-line connectors (2) where the wiring harness and the in-line connectors (2) contact the door with 3M® Open Cell Interior Foam Tape (2), P/N 051131-62385, or equivalent. It is best to insulate the entire wiring harness (2).
- Insulate the right door speaker connector with P/N 12378189.
Important
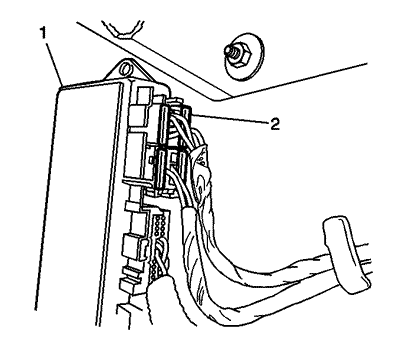
Change implemented in 2000 VIN breakpoint 123000. Vehicles built prior to this breakpoint will require the following procedure.
- Remove the screws attaching the door control modules (3).
- Add felt, P/N 12378189, to the backside of the door control modules (3) where it contacts the inner door panels.
- Position the door control modules (3) to the doors.
- Install the screws attaching the modules (3). Tighten
Tighten the door control modules (3) attaching screws to 3 N·m (27 lb in).
Important
Change implemented in 2000 VIN breakpoint 120397. Vehicles built prior to this breakpoint will require the following procedure.
Add a small piece of duct tape, 3M® P/N 051131-06969, or equivalent, to the door control modules (1) terminal positive assurance (TPA)’s (2). They are grey in color and there are a total of 4 TPA’s (2) per door. If the TPA’s (2) are blue, they are the new design and do not need to be taped.
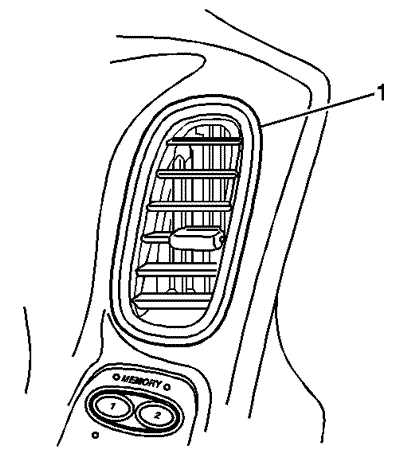
Replace the driver’s door HVAC deflector (1), P/N 10406518, if the vanes of the deflector (1) are loose and vibrate. Refer to Door Trim Panel Air Duct and Deflector Replacement in the Service Manual.
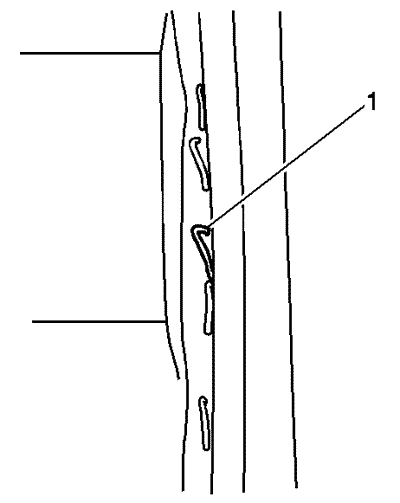
Recrimp or remove any loose staples (1) that retain the door panel leather skin to the door trim panel on the outside perimeter of the door trim panels.
Parts Information
|
Part Number |
Description |
|---|---|
|
10233183 |
Lock Rod (Left) |
|
10233184 |
Lock Rod (Right) |
|
10406518 |
Deflector |
|
10331688 |
Speaker Screen (Left) |
|
10331689 |
Speaker Screen (Right) |
|
10291759 |
Bose® Emblem |
GM bulletins are intended for use by professional technicians, NOT a "do-it-yourselfer". They are written to inform these technicians of conditions that may occur on some vehicles, or to provide information that could assist in the proper service of a vehicle. Properly trained technicians have the equipment, tools, safety instructions, and know-how to do a job properly and safely. If a condition is described, DO NOT assume that the bulletin applies to your vehicle, or that your vehicle will have that condition. See your GM dealer for information on whether your vehicle may benefit from the information.